Showing posts with label Snacks. Show all posts

Easy Enough Granola Bars


This is branching off from my granola recipe.  I have been trying to make some granola bars that stick together, don't burn, and taste scrumptious.  BINGO!  The trick is that you don't make the granola "bar" until the last minute.  Here is how it goes..........

First you make the grain-free granola recipe
This is a big recipe because we eat a lot.  The granola bars store well so it is well worth it to make a bunch of granola bars at one time.  

 INGREDIENTS:

5 cups small almond grounds (just whip some whole almonds around in the food processor)
2 cups unsweetend flaked coconut
1/2 cup chopped dried cranberries (or other fruit)

1 cup soy-free buttery spread (Earthbalance)
1 cup honey
1 Tablespoon vanilla powder
1 teaspoon nutmeg
1 teaspoon cinnamon
1 teaspoon salt

Melt the butter and honey together over the stove top, then pour the liquid over the dry ingredients.  Pour the granola mixture into two large glass baking pans and bake at 350* for about 1 hour or until golden brown on top.  You will have to stir the granola mixture around in the pan every ten minutes so it doesn't burn. 


Next find a mold you like.  I have used a mini muffin pan, a mini loaf pan, and a silicone chocolate mold.  You won't be able to cut these after they have cooled down so make sure you like the shape of your mold.  The smaller you make these the better that is why "mini" is the key word here.  


When the granola is done baking and is all golden brown, pop it out of the oven. You can let the granola cool just a little bit.  You want it to be very soft for the mold.
Press the (still warm) granola mix into the mold.  I use a small wooden mallet to compact the granola and save my fingers from burning.  THIS IS HOT, be careful.

The tighter you pack it the better it will hold together when it cools.

Let the packed granola cool in the mold for a little bit then pop the granola bars out on the counter.  Allow them to completely cool on a rack before packaging them.


These granola bars can store at room temperature for about a week.  If you live in a humid environment they will become slightly soft but will still stay together. 

Carb counts depend on how many granola bars you make.  Simply divide 400 by the number of granola bars you made and there is your carb count for each individual bar.  This is a great snack to pack for those relentlessly "hungry" kids.  It holds up well in the lunch box.

LOW - Carbohydrate gummy snacks


Yes, I know, too good to be true!

My type 1 diabetic daughter is delighted.

Before we get started on the recipe let me introduce you to the Sweet Drops liquid stevia collection.  I haven't tried them all, but the many I have tried are GREAT!
 As you can see the Stevia liquid drops come in many flavors.  CLICK HERE to get some more information.
If you want to check out some information about the health benefits of gelatin Click HERE!
If you want to check out another blog touting some more benefits and check out another jello recipe click HERE.

      INGREDIENTS:

*1 cup lemon juice
*1 cup water
* a hand full of raspberries (fresh or frozen)
* liquid lemon stevia (2 droppers full)
* 3 T honey
* 6 tablespoons beef gelatin powder

Add your lemon juice (I have frozen lemon juice on hand ) and raspberries into a small sauce pan and boil over low heat.  Mix and mash until the berries are dispersed into the liquid.

Now you are going to strain out the seeds.

The raspberries give the mixture a nice natural food coloring and add the sweet to the tangy lemon flavor.  Next you are going to slowly stir in the beef gelatin to the hot liquid.  Then add the room temperature water and other ingredients to the gelatin liquid mixture. Stir, stir, stir......
  
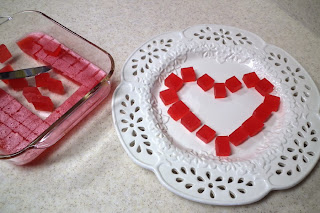
 All you have to do now is pour the mixture into a small glass pan or silicon candy mold. Put the pan or mold into the refrigerator for at least an hour so the gummies can set nicely. 
 Cut your gummies up into bite sized pieces.  I got about 70 pieces.

These gummies need to stay in a cool environment.  They will melt if left out on the counter too long.  I would say that they are good at room temperature for about thirty minutes.

I made some gummies for my kids this Halloween.  The way I packaged them created a lot of excitement.
Carb count = less than 1g of carbohydrates per gummy.


Carb-Free Popsicles ( Diabetic Summer )

Summer presents a variety of problems for the type 1 Diabetic.  One of them being the amount of food consumed and insulin needs when you are running around exercising a lot in the hot sun.  Bloodsugar needs fluctuate so fast depending on how hot it is outside, the activity level, and what type of food is eaten.  I try and make it as simple as possible for my daughter so she can adjust her insulin pump as needed.
Having a carb-free snack is one idea I have come up with to make summer easier.  My daughter can have a popsicle any time she wants, no counting carbs, no delivering insulin, no getting high blood sugar.  When she has her friends over she gets to enjoy carefree snacking. 

I have two other posts with carb-free summer food ideas........
 Carb-free jello
Low-carbohydrate ice cream

 First you are going to need to get some  liquid stevia or a carb free drink mix. I use Stevita drink mixes.  There are only a few ingredients and they are carb-free.  CLICK HERE to check it out.  CLICK HERE to check out the liquid stevia I use.  There are all sorts of flavors to choose from.
Lemons are seriously low in carbs, next to none!  Get some lemons.

Some coconut milk added to your flavoring will bring in some cream flavor.  Consuming more than 4 popsicles might add up to a few carbs and some rise in blood sugar later due to the fat content.  Just be aware. 

I saw this cool idea on Pinterest for making popsicles using a lemon slice to keep the popsicle stick upright and centered while freezing. It totally works. I took this idea and used cut strawberries instead of lemons, that works too.  The kids liked the strawberry popsicles better.
 First gather your supplies.  Small paper cups, wooden popsicle sticks, large fresh strawberries, or lemon slices, and a carb-free drink mix of choice. 

 Simply cut the lemon into thin slices and skewer the slice in the middle with your popsicle stick.  Fill your paper Dixi cup with your juice of choice, pop the lemon top on, and freeze. 
 The lemon is kinda big for this little Dixi cup.  This would work better with a bigger cup.
 The kids had lots of fun testing the final product!

 This next idea was by far the best.  Use strawberries on top of your popsicle stick. Yes there is like one carb (if that) per strawberry slice.  That is nothing for my daughter, but be aware if you start consuming multiple popsicles.
 Cut the strawberries thinly across the widest point.  Pour your drink mix into the cup and skewer the strawberry with the popsicle stick.  This keeps the popsicle stick in the middle of the cup while freezing.  GENIUS!
 Check it out, it totally worked.  These are great for birthday parties. 
SUPER EASY TO MAKE. 
 My girls loved the strawberry at the bottom, it was a treat.
I mixed up different flavored juices with the fresh strawberries.  Strawberry juice flavor of course matched the best.  Orange and grape flavor weren't too bad either.  The fresh strawberry doesn't clash with any flavor it seems.  Have fun experimenting!

Sweet Alternative To Candy Easter Treats


Here we are again bombarding the kids with CANDY for Easter.  The grocery stores, Hardware stores, and commercials all preach CANDY.  I feel like I am holding back a tidal-wave sometimes.  Eating healthy is getting so very hard.  As the kids grow up they are eating MORE AND MORE food. As the quantity increases the quality needs to be kept up too.  EXPENSIVE!

I have come up with some more Easter candy alternatives this year.  Check them out.

The first Idea I found on Pinterest, CLICK HERE to visit my Easter/Spring inspired board on Pinterest.  They used some cereal to fill their bag with, I thought why not use popcorn and call it.......Bunny Tails.  Kinda morbid humor, yes.  I have a board for that on Pinterest too.....tee hee hee!
So basically you just use the tags I made to put on the top of a ziplock bag of popped and seasoned popcorn!  Super easy right?  Let me show you.

First, pop some popcorn and season it just the way you like it. 
Print out the labels I have at the end of this explanation and attach them like shown.  You can make your own labels from the random clip art I have attached to this post if you wish.  These are just ideas for your brain to process.


Here we are all done, It looks pretty good.  If you add one cup of popcorn to each bag you are going to have a 5g carb snack.  Not too bad at all. 

You are going to need the recipe for this fun treat. CLICK HERE to visit my post on Marsh mellow Free Rice Krispy Treats!  Use this recipe and simply pack your chocolaty treats in a plastic egg.  It will supposedly take on the perfect egg shape. 
I will give you a step by step, because some of you are visual learners like me. Let's see if this works!

 The process is pretty simple as you can see from the pictures.  Grease the egg shells, fill, pack it in, then stick together.  Make sure you have enough in the egg so the two ends meet in the middle and pack together pretty well. 
 All but one of the chocolate eggs came out in pieces.  I had to stick them back together with brute force.  It wasn't too bad.  They stayed together pretty well in the bag.  Keep the treats refrigerated until your ready to present them your angelic child on Easter. 
 And here you have the finished product.  You are going to make about 8 eggs with this recipe.  The carb count will be about 43g per egg.  Not too bad.........but so much work.
At this point you have to judge if all the work is worth the product.  This process could be shortened if you just form the chocolate krispy balls yourself into an egg shaped and pop them into the frig to harden.  Who knows?


Use this printout for the tops of your bags, or make a cute one of your own.  Yes, more morbid humor, this is me people.  My 12 year old son loves this.
Here are a few more Easter images you can use to make whatever........


Remember you can always fill those cute little eggs with toys.  Check out my previous post about that, CLICK HERE to be magically transported to that page......whoosh.
Older Post ►
 

Copyright 2011 a RANCH wife is proudly powered by blogger.com